")
– Advertisement –
In the era of digital interconnectedness, our online activities are often linked through various applications and services that require access to our Google account for functionality and convenience. However, there are times when we need to manage the permissions we’ve granted and disconnect certain apps from our Google account. Whether it’s for security, privacy, or simply to declutter your online presence, knowing how to effectively disconnect apps is a vital skill for modern digital users. This guide will walk you through the process of disconnecting apps from your Google account across various devices and platforms.
– Advertisement –
Why Review and Disconnect Apps from Your Google Account?
Your Google account is a gateway to a multitude of services and data, and its security is critical. Third-party apps often request access to various Google services, such as Google Drive or Google Photos. Over time, you might forget which apps have these permissions, potentially putting your privacy at risk.
Here’s why you should review and disconnect apps from your Google account:
- Privacy Preservation: It’s common for apps to access and collect data from your Google account. Disconnecting unused or untrusted apps is a prudent step to protect your privacy.
- Security: Apps can sometimes have vulnerabilities that malicious actors could exploit. By removing unused apps, you reduce the potential attack surface.
- Data Management: Removing unneeded apps can help you declutter your account and streamline your online experience.
READ ALSO: How to Fix Gmail Not Letting You Attach Files
Disconnecting Apps on Android Devices
If you’re an Android user, you can efficiently manage your connected apps. The exact steps may vary slightly depending on your device and Android version, but the process is generally the same.
To disconnect apps from Google on Android:
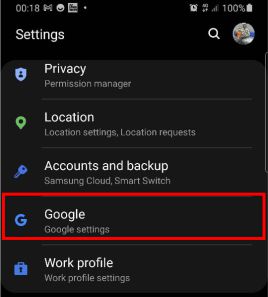
- Open Settings on your Android device, and select Google from the list of options.
- Tap Manage your Google Account under your username and email.

- Go to the Security tab. Scroll down to Your connections to third-party apps & services. If you have multiple apps connected, tap See all connections for a complete list.

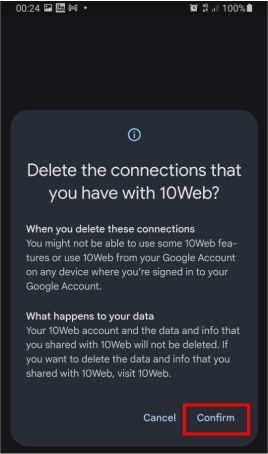
- Tap to remove an unwanted app and choose Delete all connections to disconnect it.

- When the verification message appears, tap Confirm.
By following these steps for each app you want to disconnect, you can enhance the security and privacy of your Google account.
READ ALSO: How to transfer emails from one Gmail account to another
Disconnecting Apps on a PC, Mac, or Chromebook
Managing your Google account from a computer’s web browser offers comprehensive control over connected apps.
To disconnect apps from your Google account from your web browser:
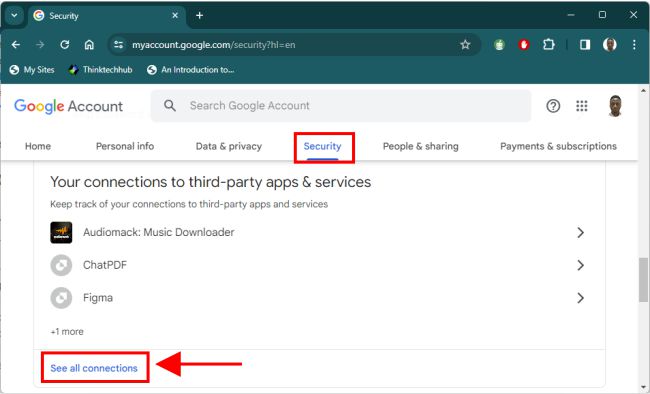
- Click the Security button in the top left corner of the page. Scroll down to Your connections to third-party apps & services and click the connected app you want to remove. To see all of the connected apps on your account, click the See all connections option.
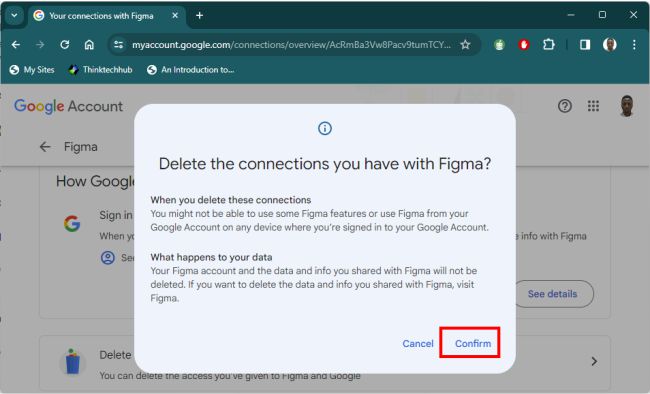
- Click the app you want to disconnect from your Google account. Select the Delete all connections you have with option to disconnect it.

- Click the Confirm button when the verification message appears.
In conclusion, a proactive approach to managing your Google account and connected apps ensures that your online experience remains safe and secure.